Crafting with Cory, Part II
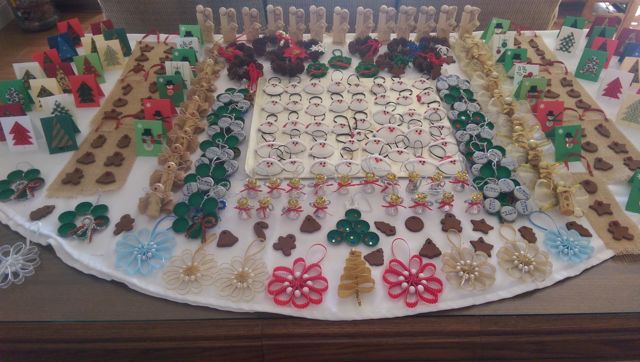
Back to Cocoa Beach to craft with my best friend, Cory! We both needed some buddy time, and lately, we’ve both found so many ideas on Pinterest to get ready for Christmas, that we just had to get together again to craft till we’re exhausted!
Pinterest is SO addictive! And so full of ideas that trigger more ideas we can use!
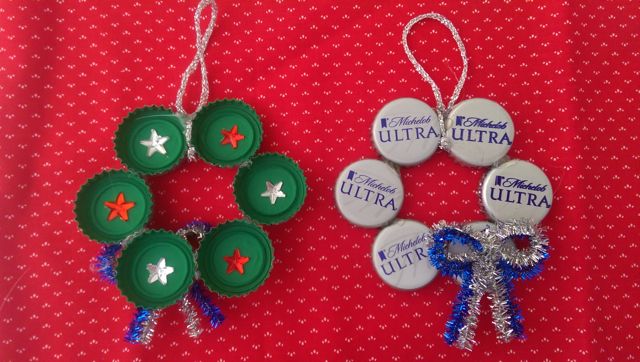
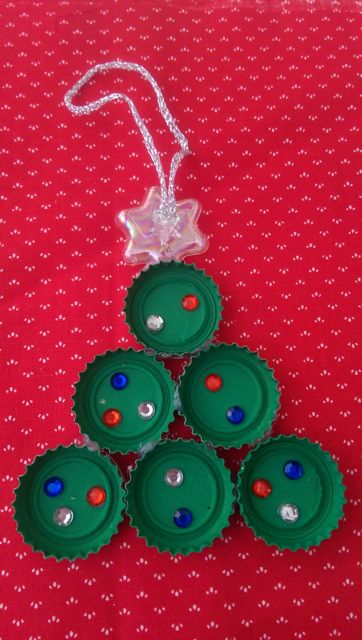
It all started with a silly ornament that we thought would be cute little gifties to give to our beer drinking friends. Cory had pre-painted the insides with green paint to make them a bit more “Christmasy.” Cory’s hubby helped getting us supplied with the beer bottle caps, which were hot glued into circles. We glued on glittery pipe cleaner bows onto the front or back, and on about half, we also glued on shiny stars to the green backs. A glittery tie for hanging was tied through the wreath and dabbed with a spot of glue for security.
Cory was playing around with other shapes, and discovered a tree shape worked equally well.
We began in earnest with the materials Cory has LOTS of where she lives: shells!
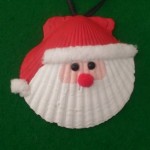
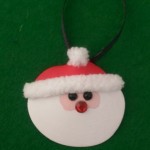
She first painted the fronts totally white, two coats, to cover the freckles we decided were distracting for a Santa beard. Then we lightly pencil drew the hat placement and face “opening.” Bright red acrylic paint was used for the hat, and soft pink for the face section. Note that the “bumpy” shells have hats that are tipped to the side, while the smooth shells have hats that end with the pompom at the top, due to the different shapes of the shells.
We had tiny black plastic domes which were great for the eyes. Only having a few tiny red pompoms for the nose, we improvised with tiny red “jewels” for the rest. These were glued on with E6000 via toothpicks. Krista had given me some leftover white fleece yarn from a baby blanket project, which served as perfect fur brim and pompom. This was applied with hot glue.
A 1/8″ black ribbon loop was hot glued to the back of the shell.
We made over 40 Santas!
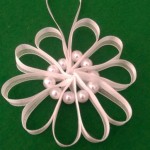
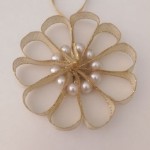
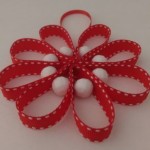
One of our mantras is “use what we have,” so we turned to ribbons and beads. The idea for this “snowflake” came from a Pinterest pin that used pieces of window screen and beads. We turned to the easier-to-use 3/8″ ribbons.
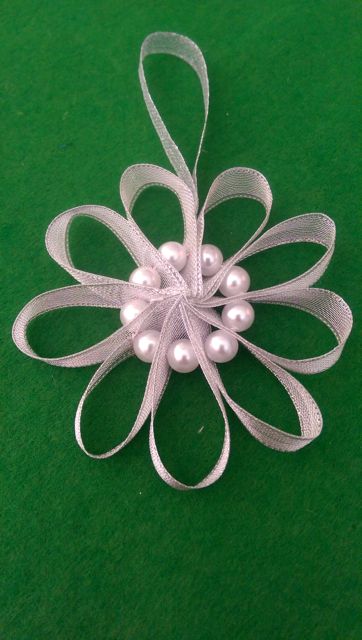
After trying various sizes of both ribbon and bead, we went with 3 1/2″ strips of ribbon. The bead size determined how many strips each one required. Smaller beads needed 10 strips, the larger beads only needed 8 strips.
Using thread, we strung alternating a loop and a bead, at about 1/2″ from the cut edge, connecting the ends to create a circle. One different hanging loop of 1/8″ ribbon was included between loops. Then we sewed the centers together, creating a small swirl of cut edges in the center.
It was a little tricky making the connecting stitches, but the knots pretty much disappeared between the loops and beads.

We kept saying, “Oh, let’s make —– because that’ll be so quick.” OK, NOT! Nothing was that fast. That includes our candy Kiss angels. I had received these for years, often attached to the gift. I never realized how fussy they were to make!
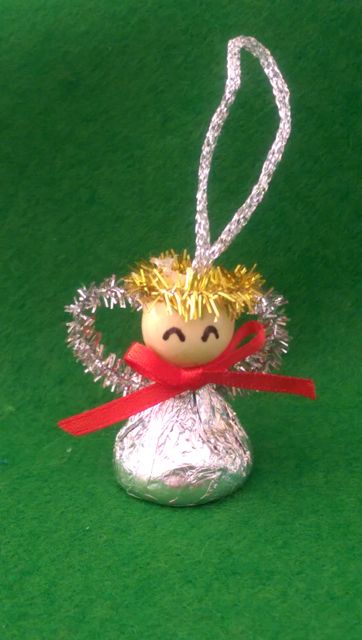
Cory came up with the efficient way to make the tiny halo: glittery gold pipe cleaner! Likewise for the wings, using silver. A tiny bow of 1/8″ ribbon for the front and a fine silver cord for the hanging loop. Draw on eyes with a Sharpie. Easy, right?
No.
The difficulty arises when you go to glue on these itty bitty parts. We decided that we need to invent a hot glue gun with a super fine applicator tip, and glue that doesn’t make strings. And, by the way, not too hot so the chocolate doesn’t melt and you don’t burn your fingers on the tip. Is that too much to ask???
We had admired these simple nativity sets for some time, so Cory had pre-cut some wooden blocks from leftover home projects as a starting point. We also had the twine and wooden balls that served as the two adult heads. But we had to buy (GASP!) a 1/4 yd. of burlap and the small wood “buttons” for the baby head. Assorted flat disks, wood and cardboard, served as stabilizing platforms.
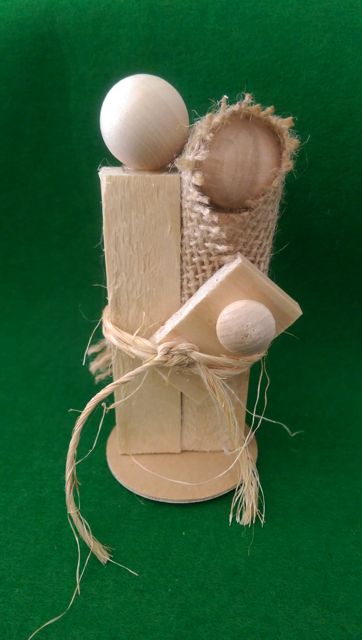
Ideally, the wood would have measured 3/4″ by 3/4″ in thickness, but we were using available scraps that were about 3/8″ by 5/8″ thick. Joseph’s body was cut to 3″ tall, Mary was 2 1/2″ and Baby Jesus’ body used a thin flat piece that was about 5/8″ wide by 1 1/4″ long.
Using hot glue, attach all three heads. Next we hot glued a rectangle of burlap (4 3/4″ by 2 1/4″) to Mary’s head, front and down her one side. Then line up the sides of the two adult bodies and glue those together. Baby Jesus comes next.
The burlap had to be smushed flatter before wrapping the twine around twice and square knotted in the front, where it is secured with a dot of glue. Hot glue the disks onto the bottom of the adult bodies.
We needed to add a bit more flavor to our crafting, so we mixed up a batch of Martha’s gingerbread cookie mix, using applesauce, cinnamon, and glue. They smell great, not overpowering, and super hard.
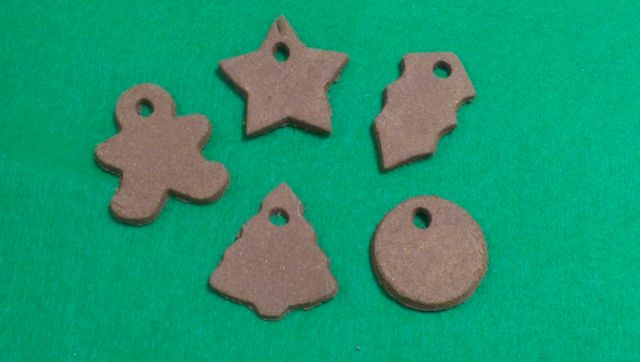
At first we thought we’d only use them individually, just attach ties for hanging. But, since we had used some very small cookie cutters, we came up with a couple of new ideas.
One night, Cory couldn’t sleep, but her creative juices kept on flowing. She came up with this adorable banner idea, using some of our leftover burlap.
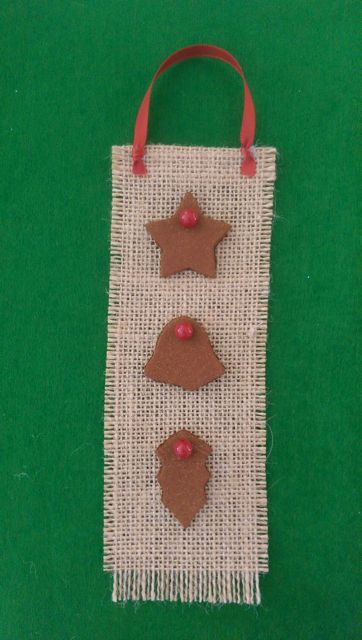
We cut the burlap into 8″ by 2 1/2″ rectangles, folded over the top about 1/2″, inserted a short length of wooden barbeque skewer, and hot glued it down. Red beads from an old necklace were glued into the holes (that were meant for inserting a hanging loop) of three cookie. These were then glued onto the burlap. A short strip of 3/8″ matching ribbon was knotted at each end and glued onto the front top ends.
In the spring, I had collected a huge box of lovely little pine cones that had blown into my backyard from the neighbor’s tree. I saved them for future use.
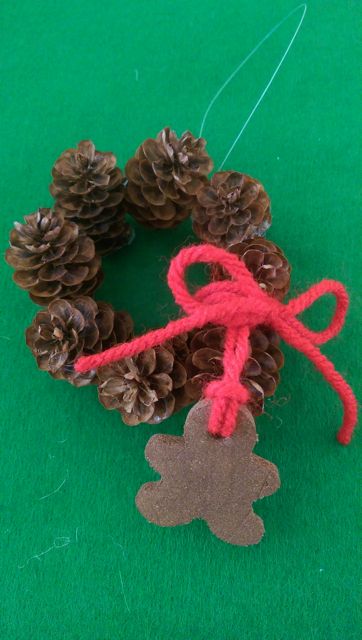
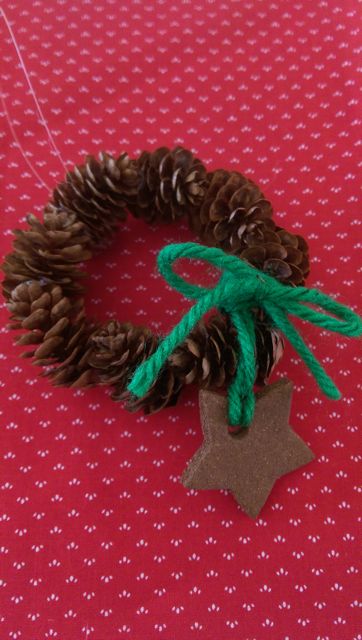
Before we started, I baked the pine cones for 40 minutes at 200 degrees. Then we glued them into circles with hot glue. Using yarn to attach one of the cookies, we then wrapped it around in the lower right corner of the wreath, ending in a bow.
Easy, yes, but just a bit tricky getting the pine cones to stick to each other due to their delicate structures. Making them uniformly round was helped by using a grippy circle of shelf lining under the cones as we glued.
Cory’s husband may take care of drinking enough beer to supply us with bottle caps, so Cory and I have to supply the wine corks.
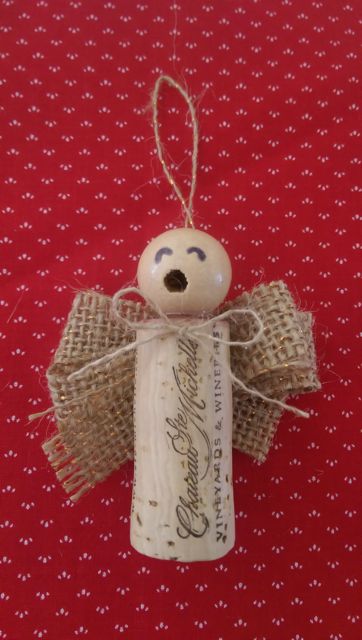

There are so many cute ideas for making cork angles, we chose the features that we liked the most. Since cork is natural, and burlap is natural-looking, we put that combination to work.
I cut the burlap into strips, criss-crossed them into flat bows which Cory stitched down the center with the sewing machine. These were hot glued on the stitching line and glued to the top of the corks to make wings. Using round wooden beads, we turned one of the holes toward the front, making a “singing mouth,” and glued them to the flat top of the cork. The other hole we used to glue in a tie for hanging. We used the unraveled threads from the burlap to make the delicate bows on the front.
Last year we had made some very pretty fancy angels, and had quite a lot of the delicate sheer ribbon that they were made from. So we chose that same wide ribbon to fancy up the cork angels.
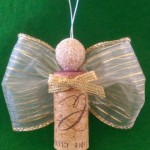
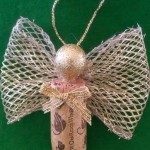
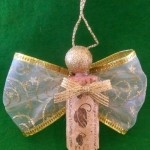
These were made in a similar fashion, only the ribbon was made into gathered bows before gluing, and the heads were made (believe it or not) out of glittered artificial grapes! A shiny 1/4″ ribbon was used to form the front bows. The hanging ties were glued to the cork backs before the wings went on.
While we had the shiny ribbon out, we went back to last year’s design for ribbon trees. And, instead of using pearls to separate the ribbon loops, Cory suggested making it a whole lot easier by using the glittery pipe cleaners for stringing the ribbon.
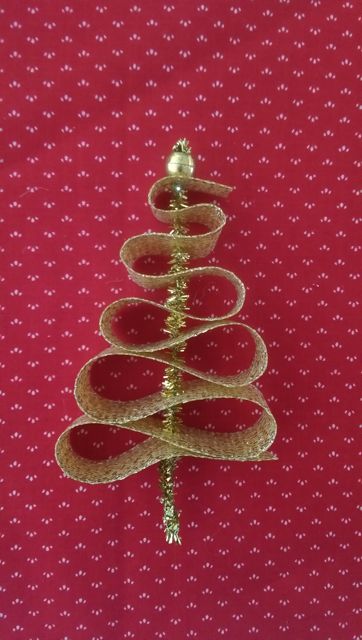
And, boy was it easier! The ribbon stays in place without using the pearls, and no more issues about finishing off the top and bottom: a shiny pony bead works at the top, and folding over the pipe cleaner at the bottom is sufficient. The ribbon can be just poked through; you need to make little snips so they don’t snag.
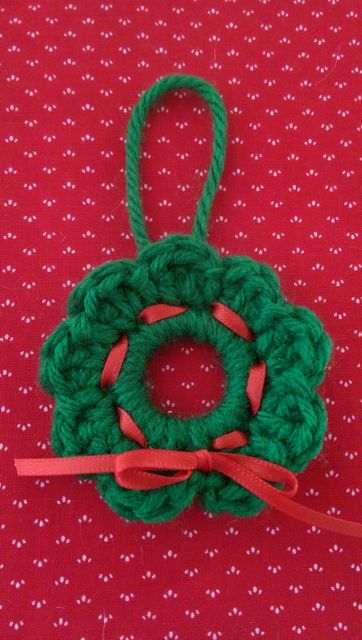
Here and there, we made some simple crochet wreaths. Cory is learning to crochet, so she was always writing notes to herself about technique. They are pretty basic – 16 stitches around a plastic ring, and 8 shells around with slip stitches in between. A red ribbon or yard is woven through to add color. They can be hung by a loop of the same yarn; Cory plans to add magnets for the church sale.
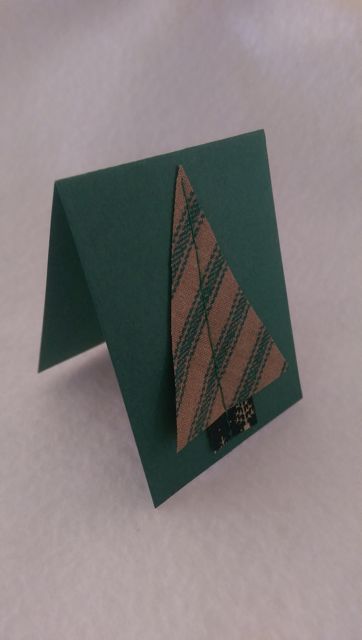
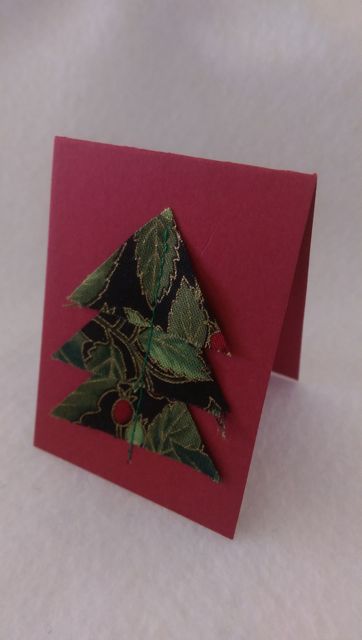
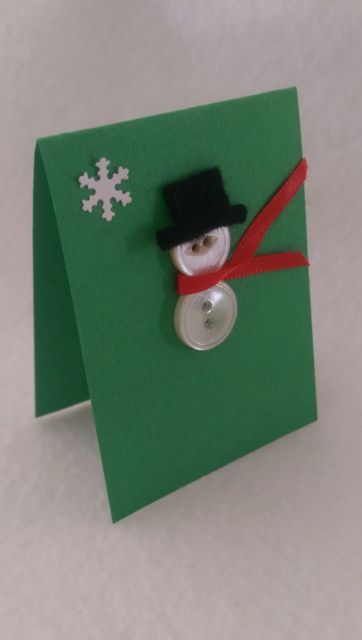
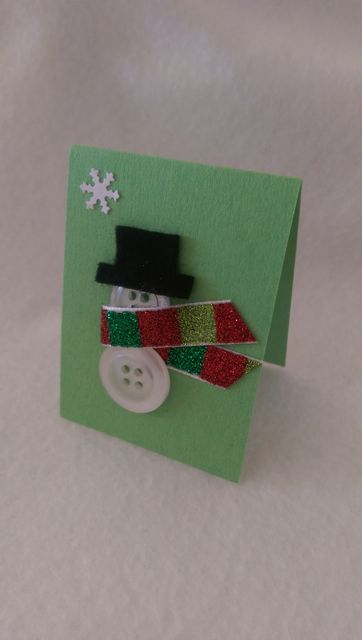
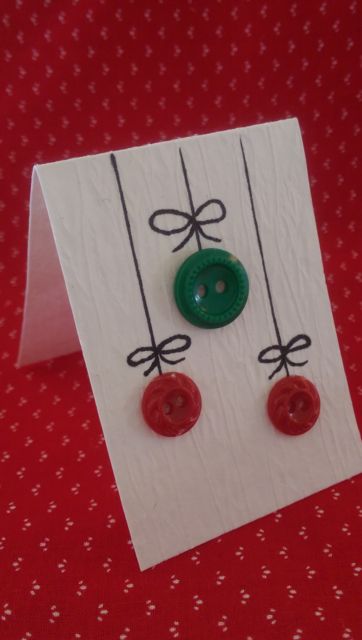
Our last big collection was made from card stock and fabric or buttons. These were made from small triangles that we sewed down the middle using the sewing machine.
These used buttons, glued on, with felt hats and ribbon scarves, and a tiny punched paper snowflake.
These were just buttons with Sharpie details.
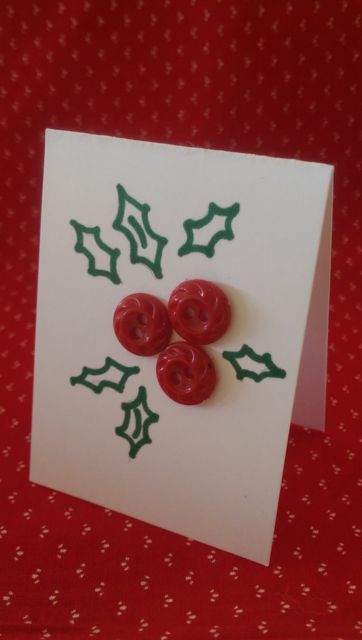
Since we have a mountain of Christmas fabric scraps, and lots of buttons, we ended up with LOTS of gift tags!
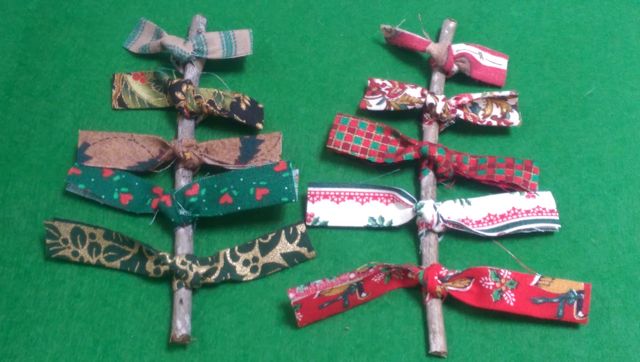
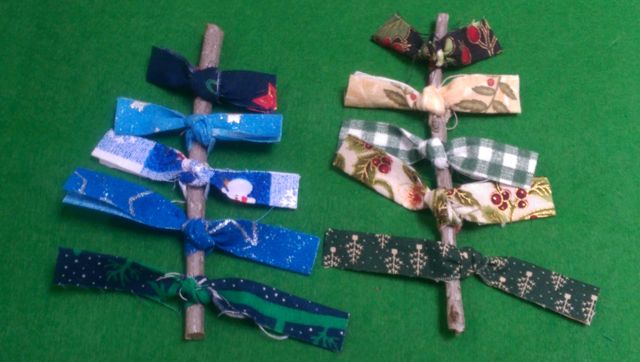
The last item we made on the last day of crafting, in between running errands, packing, and a relaxing dinner with hubby. They were probably the easiest craft of all.
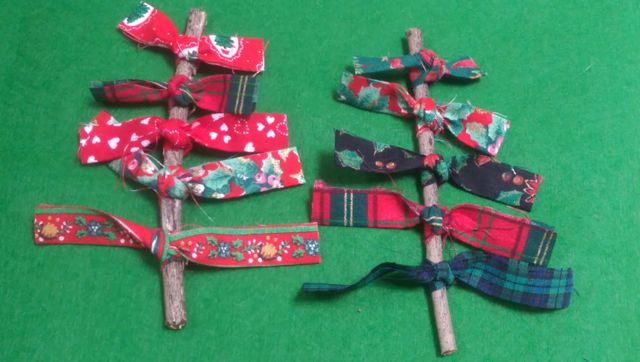
Cory and I clipped tiny twigs from the bushes bordering the condo’s property. We cut strips of Christmas fabric, a little over an inch wide and 9″ long, five for each tree. We tied them onto a 6″ twig, with a square knot. Then we trimmed off the ends to the shape of a tree: about 1 3/4″ at the bottom, tapering to 3/4″ at the top. Dabs of glue hold the knots in place, and fishing line is tied at the top for hanging.